
Nvidia recently presented RTX Voice, a software to filter out anything that’s not human voice. Sounds great! So what’s stopping me from running it on my work laptop?
Nvidia’s official system requirements claim that you need an RTX GPU, and run Windows 10. Unfortunately, my laptop does not have a compatible GPU, and it runs on Linux. Bummer.
werman’s noise suppression plugin is an open-source alternative that also supports Linux. However the RTX Voice demos are definitely more impressive than the samples of Xiph’s RNNoise, which it is based on. So let’s keep pressing. What if I don’t actually run the software directly on my laptop? Instead, I could just route all sound from the laptop through a second machine that can run the real thing!
Luckily I do have a retired gaming PC with Windows 10. It does not have an RTX GPU, but it turns out you don’t actually need one anyways. And indeed, I am able to make it work on its GTX 1060! I am really impressed by RTX Voice’s capabilities. The funniest thing happens when you play music: It turns into reverse Karaoke where all but the singer’s voice is gone.
Now, how do I hook this up to my work laptop so I can finally filter out my colleague’s blue switches before they reach my ears? I don’t really want to stream my audio to the gaming box, because it will cause delay, and no work-related data should be exposed to the internet via an unmanaged personal machine. Instead, I go for good old analog 3.5mm audio jacks.
You could route the laptop audio to the gaming PC and back, but a better idea is to connect the headset directly to the gaming box, and also filter my own voice before it goes out. The gaming PC only has only one 3.5mm microphone jack and one 3.5mm headphone jack, but my headset connects via a USB dongle. Otherwise I would have to add a USB sound card.
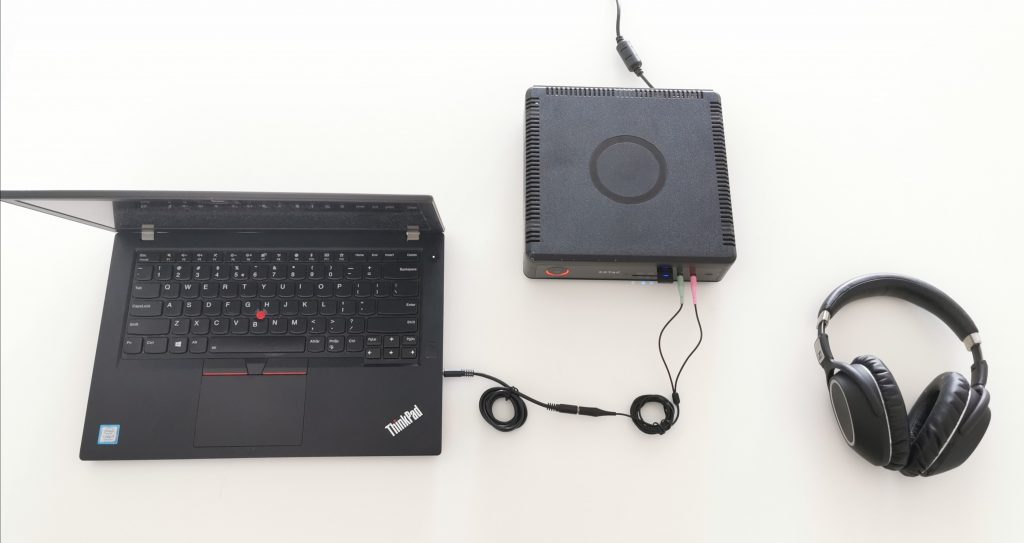
Obviously you need to cross over the laptops’s output to the gaming box’s input, and vice versa. I am lucky that the gaming PC has separate jacks for input and output, and I have all the right cables: A four-pole 3.5mm male-to-male, and a headset-to-headphone-and-microphone splitter Y-cable. Keeping the infamous box of old cables does pay off sometimes.

The cable needs four poles: L,R,G,M 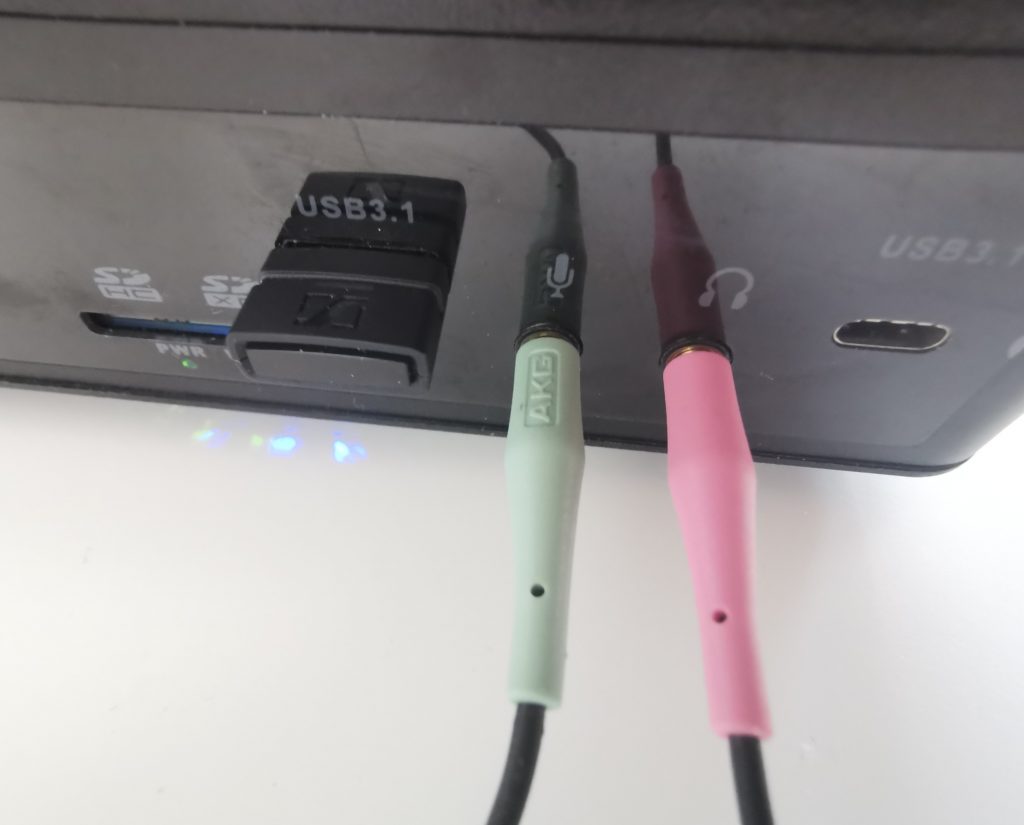
Audio in and out is split and crossed over
The most difficult part of the setup was to figure out how to route sound in Windows. I tried some apps like Virtual Audio Cable, but they all introduced noticeable delay. The best solution by far is to make Windows “listen” to input devices – on specific output devices.

Use the actual headset as input and output devices 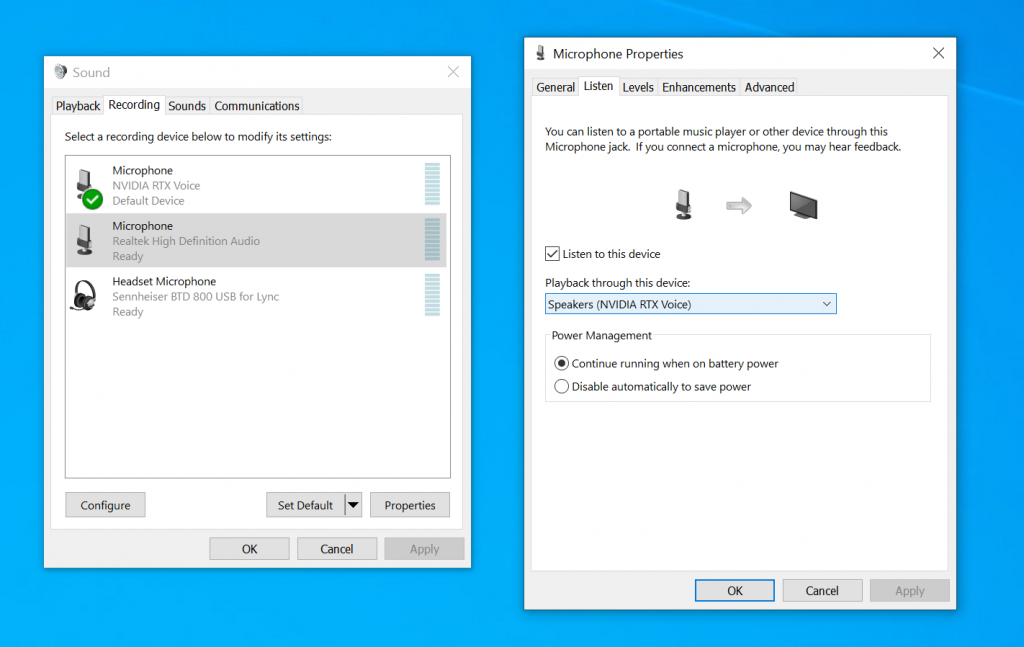
“Listen” from 3.5mm input to RTX Voice Speakers 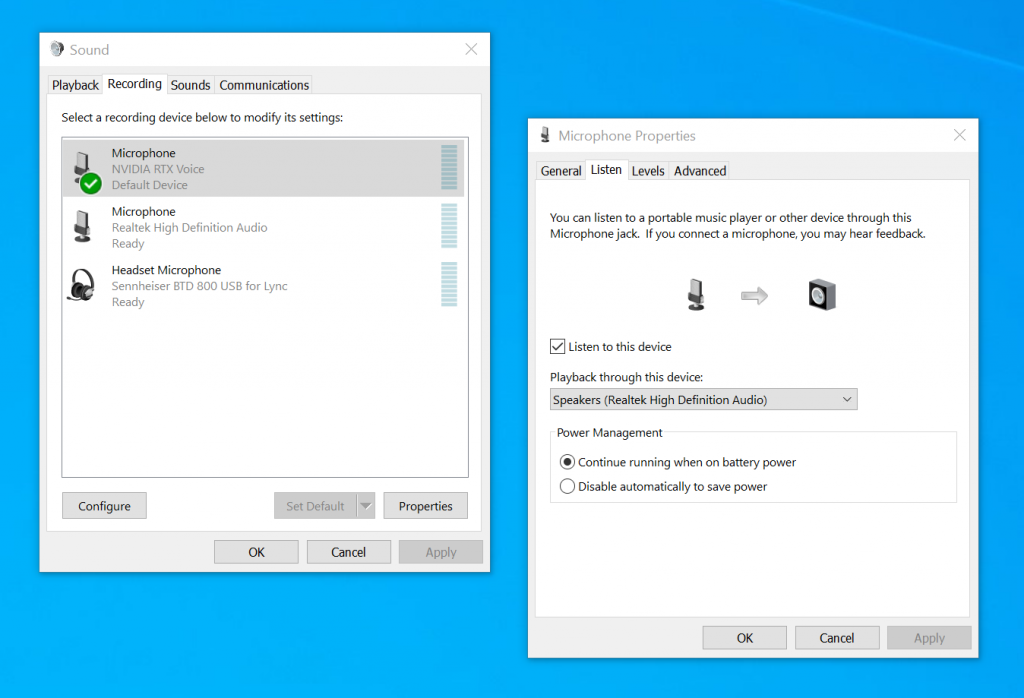
“Listen” from RTX Voice Microphone to 3.5mm output
With all the details worked out, I can connect everything up. Here’s the complete audio routing in one graph. It works great!

I am very happy with my solution. No work data (including communication) is exposed to the internet, there is no additional CPU or GPU stress on the laptop, and I get superb and almost lag-free bidirectional noise suppression. Success!


Anonymous
2021-06-23 — 19:16
this is not on linux
Laurenz
2021-06-27 — 18:32
You’re correct, RTX Voice is not running under Linux here. But the setup allowed me to use it with my Linux machine. That’s a win in my books 🙂
matou
2021-09-09 — 10:09
This is a really neat idea. Thanks for the article!
Of course a very limited use case as one needs the hefty windows machine in addition to another computer. But I definitely like it and wouldn’t have come up with it by myself.
I also didn’t know about that “listen” feature before and that seems super useful for other applications as well.