
Synology’s DSM 6 does support ssh logins – but only for administrator users. There is no setting or config file for this: Synology ship a custom version of OpenSSH that prevents anybody but root from logging in. Wow. I don’t know how anybody at Synology thought that would be a good idea, because this just makes people assign superuser privileges to their regular user accounts.
In my use case I want to ssh to my diskstation from a server cronjob, so I would have to leave superuser credentials on an public-internet facing server 🤦♂️. Let’s not do that. In this post I will go over how to install a vanilla OpenSSH sshd which enables regular users to log in via ssh.
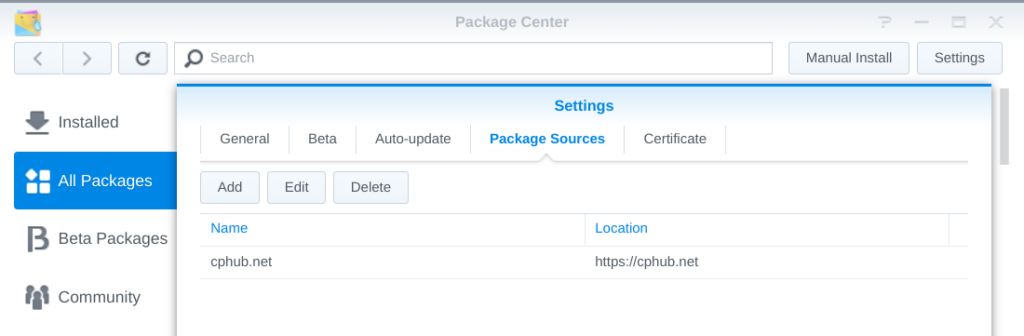
While it’s possible to cross-compile and install OpenSSH from source, we will go the easy route and install it via the Optware opkg package manager. First, let’s install opkg itself via the Easy Bootstrap Installer (EBI). Make the Diskstation’s Package Center find EBI by adding https://cphub.net/ as an additional package source. Don’t forget to hit the reload button to fetch the new source.
Search for EBI and install it. You will have to decide between the Entware and Optware distribution. Choose the one with the more recent OpenSSH. To find out what version is offered, find out your Diskstation’s arch and check the respective package index. You can find them at Entware (mipsel), and Optware-ng (mipsel-ng), respectively. I went with Entware on my DS218.
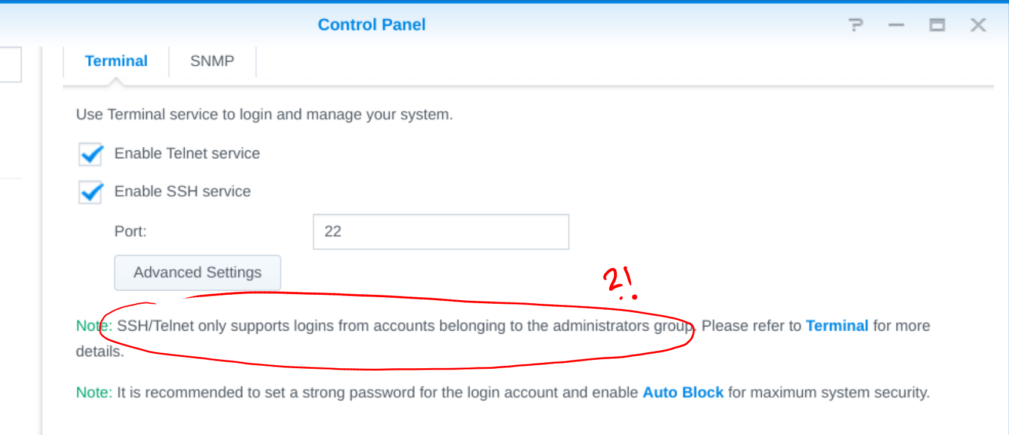
Next, make sure the ssh and telnet services (we need both!) are enabled in the Control Panel Terminal tab.
Open up a new ssh connection to the Diskstation (mine has diskstation as hostname). Log in as admin to opkg update and opkg install openssh-server-pam (we’ll continue to use Synology’s pam modules like autoblock, so the new sshd needs pam support).
ssh admin@diskstation

sudo /opt/bin/opkg update
sudo /opt/bin/opkg install openssh-server-pam
My Diskstation’s built-in /bin/sshd has version OpenSSH_7.4p1, OpenSSL 1.0.2u-fips 20 Dec 2019, while opkg installed /opt/sbin/sshd with version OpenSSH_8.3p1, OpenSSL 1.1.1g 21 Apr 2020.
So far so good. Now we’re getting into more dangerous territories. We need to modify the system’s /etc/passwd, /etc/group, and /etc/ssh/sshd_config files.
# 1. Add the privilege-separated sshd user
sudo cp /etc/passwd /etc/passwd.orig
echo 'sshd:x:74:74:Privilege-separated SSH:/var/empty/sshd:/sbin/nologin
' | sudo tee -a /etc/passwd

# 2. Replace /sbin/nologin with /bin/sh
# in /etc/passwd for your non-admin user

# 3. Add the sshd user group
sudo cp /etc/group /etc/group.orig
echo 'sshd:x:74:' | sudo tee -a /etc/group

# 4. Let sshd use the existing host keys
sudo cp /etc/ssh/sshd_config /etc/ssh/sshd_config.orig
sudo sed -i 's/#HostKey /HostKey /g' /etc/ssh/sshd_config

# 5. Make a link to the real sshd_config at the place where the new sshd will look.
sudo mv /opt/etc/ssh/sshd_config /opt/etc/ssh/sshd_config.orig
sudo ln -s /etc/ssh/sshd_config /opt/etc/ssh/sshd_config
Time to try it out! Start the new sshd on a free port and see if you can connect to it from your machine.
# check if the new sshd will work
sudo /opt/sbin/sshd -p 22000

ssh mynonadminuser@diskstation -p 22000
Now comes the dicey part that scared me the most: The sshd heart transplantation. We will telnet to the diskstation, stop and kill all sshd processes, and finally replace and start our new sshd binary. Here we go.
# Enter via telnet, not ssh!
telnet diskstation

# Stop the sshd service and kill remaining processes
sudo /sbin/initctl stop sshd
sudo killall sshd

# Swap out the binary
sudo cp /bin/sshd /bin/sshd.orig
sudo cp /opt/sbin/sshd /bin/sshd

# Start the service again
sudo /sbin/initctl start sshd

# Check the log to see if all that worked out
sudo tail /var/log/upstart/sshd.log
Operation successful, patient dead? Let’s check the pulse.
ssh mynonadminuser@diskstationIt lives! Wipe the sweat off your forehead, pop the 🍾 and add some finishing touches.
ssh admin@diskstation

# Add the .ssh dir with correct permissions
cd ../mynonadminuser
mkdir .ssh
sudo chmod 0700 .ssh
sudo chown -R mynonadminuser:users .ssh
# Copy keys from your machine for sshkey authentication
ssh-copy-id mynonadminuser@diskstationCongratulations on unchaining your Diskstation! Let me know in the comments how you plan on sshing the station for fun and profit ⬇️.
- Edit 2020-04-22: Corrected sshd_config symlink command, thanks @Babybox!


babybox
2021-04-22 — 10:22
HI!
Thanks for the useful method! I tried to follow it. but i ran into some issues:
sudo ln -s /opt/etc/ssh/sshd_config /etc/ssh/sshd_config >> can’t link, the sshd_config is already exist in /etc/ssh >> should i just delete the /etc/ssh/sshd_config than link from /opt/etc/ssh/sshd_config?
sudo /opt/sbin/sshd -p 22000 >> Unable to load host key: /opt/etc/ssh/ssh_host_rsa_key & Unable to load host key: /opt/etc/ssh/ssh_host_ed25519_key >> i couldn’t find any info about generating keys for the entware’s openSSH. I think this would be the dpkg-reconfigure SSH command in debian, but how could i generate keys for the entwaer version?
And here i just stucked. I’d appriciate any help!
Thanks!
Laurenz
2021-04-22 — 11:21
Hi Babybox, glad you find it useful!
I think I might have mixed up the target and link name for the
lncommand in the writeup. Checking on my diskstation:So it should probably be
sudo ln -s /etc/ssh/sshd_config /opt/etc/ssh/sshd_config. Can you check? Then I will update the post.Regarding the host keys, the sshd config will just use the existing ones. I remember I looked into it and generating new ones was not straightforward, and the old ones are just fine.
Babybox
2021-04-22 — 13:06
Thanks! Unfortunately there is still something:
sudo ln -s /etc/ssh/sshd_config /opt/etc/ssh/sshd_config
ln: failed to create symbolic link ‘/opt/etc/ssh/sshd_config’: File exists
Babybox
2021-04-22 — 13:12
Please ignor my comment, if you can delete it. I was dumb, and i left the sshd_config file in /opt/etc/ssh, so of course there it couldn’t be linked. I’m continuing the steps. Will report back!
Laurenz
2021-04-22 — 13:16
Probably you missed the
mvin step 5? It renames that file to .orig, so it shouldn’t exist under that name when you create the linkBabybox
2021-04-22 — 14:10
Thank you for the awesome content! Now with the change of the symlink command everything works just as it should! At the end i had to set the permissions for nonadminuser’s ~, ~/.ssh folders and ~/.ssh/authorized_keys file, and after that the key auth is working great for nonadmin user too. These were the final steps i made:
ssh nonadminuser@diskstation
chmod 700 ~
chmod ~/.ssh
chmod 600 ~/.ssh/authorized_keys
I think it was the nonadminuser’s home folder with the non right permissions, but the other steps didn’t hurt either.
I’m thinking if now that syno’s openSSH server is changed to “vanilla” openSSH server do you think we could change to allow SSH with only key based authentication to the Synology? And let’s hope with DSM7 it still stays this relatively simple, or at least we’ll have the right to allow other nonadmin users to SSH to the synology.
If i may: can i translate this tutorial to hungarian lanhuage? I’m from Hungary, and i think the synology community in Hungary could use this. Of course linking to your contetnt.
Thanks again for the awesome work!
Laurenz
2021-04-22 — 14:25
Awesome, I’m glad you got it to work!
I’m using key-auth myself, I think there were no additional steps needed, I just did
ssh-copy-id🙂Feel free to translate, I’m happy if this helps as many people as possible! Appreciate the link back of course 🙂
Babybox
2021-04-22 — 14:32
Thanks! I’ll llink the translation as i finish it.
With only key-auth i mean deny login with password. In the sshd_config set PasswordAuthentication from yes to no, so the only option to login is the key. I think i tried it in virtual DSM before i’ve found your article and it just messed up the system, but with a full ssh server maybe it would work.
Babybox
2021-04-23 — 16:40
Hello!
First of all, here is the translated version:
https://logout.hu/bejegyzes/vereshurka/nem_admin_felhasznalo_ssh_belepes_engedelyezese_sy.html
This is a tech related forum in Hungary where you can write your own blog if you want. It is not a verbatim translation, but the point is there, i hope it is not a problem.
Secondly: i don’t know if you played around with it, but i tried it out in virtual DSM that what if the DSM gets updated. I’ve downloaded these versions of DSM:
6.1-15047 –> i think the openssh server is outdated, so there was no luck to install the entware’s version
6.2-23739 –> everything went well, this was the starting point
6.2.2-24922 –> the update to this version of DSM was smooth, the only thing was changed that the non admin user lost its permission to login via SSH, so i had to change it in the /etc/passwd file from /sbin/nologin to /bin/sh again
6.2.4-2556 (latest DSM) –> when i updated, the login broke again ,and it was not so simple to make it work like it was in the 6.2.2-24922 version. The permission to login was again lost, and i had to make other changes too:
1. removed the /opt/etc/ssh/sshd_config file
2. linked the /etc/ssh/sshd_config again to /opt/etc/ssh/sshd_config
3. checked again if non admin user is able to login via SSH:
sudo /opt/sbin/sshd -p 22000
and then logged in:
ssh nonadminuser@diskstation -p 22000
just like you did in the description
4. telnet-ing to the nas
5. stopped and killed sshd services again
6. Changed the binaries again:
sudo rm /bin/sshd
sudo cp /opt/sbin/sshd /bin/sshd
7. restarted SSH services
After these steps everything worked as before. Could you please write about your experiences updating the NAS? Or if you didn’t make such a thing could yet, could you check if anything is wrong with my approach here? I think on the 6.2.4 version of the DSM the openssh server was updated too, that’s why it was broken. But i’m just guessing here.
Unfortunately DSM7 does not support 3rd party packages yet, so i couldn’t test it with DSM7 yet.
Laurenz
2021-04-24 — 10:01
Köszönöm!, hope it helps a lot of people 🙂
I have not tried virtual DSM yet. But on the last update, my ssh broke in the same way you described. I re-replaced the
/bin/sshdwith/opt/sbin/sshd, fixed/etc/passwd, and restarted the ssh service. Everything else was still working.An easy way to check if /bin/sshd needs replacing is checking the version:
hermlon
2021-06-17 — 18:14
Thanks for this awesome guide.
In my case the login shell in /etc/passwd for the non-admin account was reset to /sbin/nologin after every reboot of the DiskStation. I therefore created a new Triggered Task/User defined Script using the Task Scheduler GUI which gets triggered at Boot-up, is run by root and replaces the login shell back to /bin/sh:
sed -i ‘/^my-nonadmin-username/s/\/sbin\/nologin/\/bin\/sh/’ /etc/passwd
I really hate Synology forces you to do such silly workarounds for “security” reasons.
Magissia
2022-05-28 — 13:37
Works well even with current versions of DSM6 at this day.
I changed the path to use system’s host keys but I kept separate sshd binaries and config : it doesn’t hurt to have two ssh server running and I can hide sudo from the non admin ssh server and it allows survival when Synology updates their sshd binary.
Hartmut
2023-11-18 — 13:17
Hi and thanks for the great guide and the helpful comments.
I’d only disable telnet in the end, for security reasons.
Hartmut
2023-11-19 — 11:20
Unfortunately, I came across some side effects (DS214+ with DSM 6.2.4-25556 Update 7). After exchange of the sshd by
OpenSSH_9.4p1, OpenSSL 3.0.10 1 Aug 2023
from the Entware repos, rsyncd was not starting anymore. There seems to be an incompatibility with the “native” rsync. I could not trace down the reason because the syno initd-scripts are rather complex and when I called S84rsyncd.sh the ssh connection was closed. Probably I should have replaced rsync as well, but I didn’t.
Also, I was unable to log in with publickey authentication (although I’m sure I did it in the right way).
Anonymous
2024-03-01 — 16:53
Hi, thank you very much for this walkthrough. I would like to add that in DSM 6.2.4-25556 Update 7, the reboot of the synology readapt the /etc/passwd shell of unprivileged user with /sbin/nologin.